Quarkus in Multi-Module projects

You are developing a web application using Quarkus that consists of multiple (micro)services and a bunch of supporting libraries. Since maven modules provide sufficient isolation, you decide to use a parent project to keep dependency versions and parameters in sync and a Maven Reactor to build them together.
This blog post is for you. A special thanks to Alexey for helping out.
Moving parts
Our objective is to have a development setup where we can edit any of the services or libraries and then run them individually or all together. Ideally without the need to alter configurations between runs and the ability to deploy the setup using devcontainers (note: that's about the development setup, not about deploying the finished application). There are some moving parts:
- Quarkus CLI or Maven plugin
- Multi-Module Maven to keep libraries and services together and apart
- Maven profiles to conditionally modify maven runs
- Maven's
<pluginManagement>and<dependencyManagement>to define configurations without activating them - Your favourite Ide configured for Java and Quarkus
- Understand how VSCode's Tasks work
- Know how to setup DevContainers, especially when you need sidecars
That's a lot, let's dig in.
Mechanics and constrains
To fully enjoy the detailed setup, there are a few things you need to be aware of. I encourage you to entertain the provided links for a deeper dive:
- When calling
mvnon the reactor (also called the root project), Maven resolves the dependencies between the modules. It will know thatservice1depends onlibrary1and lives in the same project. - Running
mvninside of any module doesn't use the project to resolve and you end up either with an error or an "older" version from a registry, including your local.m2. - You can limit a build to specific module using the
-projectsswitch in conjunction with-also-make - Entries in the
<pluginManagement>and<dependencyManagement>elements are defined, but not activated unless repeated in<plugins>or<dependencies>. Elements inherit, but can overwrite, these settings. - I categorically separate Maven reactor (the
pom.xmlcontaining the<modules>element) and Maven parent. It is cleaner and allows to re-use the parent in other projects (once deployed to a registry). Most examples mess them together, don't do that and thank me later. - The
quarkus devmagic is triggered by thequarkus-maven-plugin. When presend in a module, Quarkus will launch that module with a debugger port (default 5005) listening - Maven profiles that are active by default are switched off once a single profile is specified using
-P
Setup
We need to create the maven project structure and the settings for the individual modules.
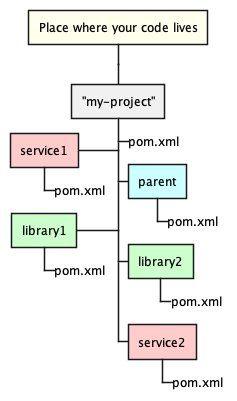
I recommend to start with the parent module and work backwards to the reactor. We can create the parent using the quarkus cli:
mkdir my-project
cd my-project
touch pom.xml
quarkus create app com.myorg.demo:parent --maven --no-wrapper --java=21
code .
This sets up an empty pom.xml for the reactor and a Quarkus app that will become our parent project. Time to edit what the CLI has generated for us.
Adjust the parent project
The generated Quarkus project is a standalone project, so we need to adjust it and turn it into the parent every developer wishes for:
- move the
.gitignore,.dockerignoreandREADME.mdfiles one level up - edit the
pom.xmlin parent: - add
<packaging>pom</packaging> - remove dependencies that don't have
<scope>test</test> - in
<build>replace<plugins>with<pluginManagement><plugins>and</plugins>with</plugins></pluginManagement> - delete in parent:
target,.classpathand.project - later you can delete
src, but keep it for now, we need some files to copy to other modules
Configure the reactor
Let us keep the reactor clean, only specifgying the modules. Copy this into your empty my-project/pom.xml:
<?xml version="1.0" encoding="UTF-8"?>
<project xmlns="http://maven.apache.org/POM/4.0.0"
    xmlns:xsi="http://www.w3.org/2001/XMLSchema-instance"
    xsi:schemaLocation="http://maven.apache.org/POM/4.0.0 https://maven.apache.org/xsd/maven-4.0.0.xsd">
    <modelVersion>4.0.0</modelVersion>

    <parent>
        <groupId>com.myorg.demo</groupId>
        <artifactId>parent</artifactId>
        <relativePath>./parent</relativePath>
        <version>1.0.0-SNAPSHOT</version>
    </parent>

    <artifactId>apps</artifactId>
    <name>Application collection</name>
    <description>All backend modules as micro services</description>

    <packaging>pom</packaging>

    <modules>
        <module>library1</module>
        <module>library2</module>
        <!-- service modules are defined in profiles -->
    </modules>

</project>
!!! info Points to note
Important details are: `<packaging>` and `<relativePath>`. Don't miss them. The relativePath in the reactor starts with a single dot - `./parent`, while later in the modules, you will need two - `../parent`
Create a library module
Library modules don't run stand-alone, but get referenced by other modules or services, so the setup is light.
Create the directories library1 and library2 and maven folder structure, easiest using:
mkdir -p library1/src/main/java
mkdir -p library2/src/main/java
Create test and other directories as per maven convention. Edit the respective pom.xml files, use this as starting point:
<?xml version="1.0" encoding="UTF-8"?>
<project xmlns="http://maven.apache.org/POM/4.0.0"
    xmlns:xsi="http://www.w3.org/2001/XMLSchema-instance"
    xsi:schemaLocation="http://maven.apache.org/POM/4.0.0 https://maven.apache.org/xsd/maven-4.0.0.xsd">
    <modelVersion>4.0.0</modelVersion>

    <parent>
        <groupId>com.myorg.demo</groupId>
        <artifactId>parent</artifactId>
        <relativePath>../parent</relativePath>
        <version>1.0.0-SNAPSHOT</version>
    </parent>

    <artifactId>library1</artifactId>

    <dependencies>
    <!-- add dependencies as needed -->
   </dependencies>

    <build>
        <finalName>library1</finalName>
        <plugins>
            <plugin>
                <artifactId>maven-compiler-plugin</artifactId>
            </plugin>
            <plugin>
                <artifactId>maven-surefire-plugin</artifactId>
            </plugin>
            <plugin>
                <artifactId>maven-failsafe-plugin</artifactId>
            </plugin>
        </plugins>
    </build>

</project>
Points to note
- You don't need to repeat the
<groupId>for the project - add dependencies as needed
- version numbers are kept in the parent project, don't repeat them
Create an application module
The application module has extra requirement, you need to specify:
- the HTTP port, you can only have one service per port. The default is
8080 - The debug port, same thing. the default is
5005 - a profile with the name of the module, so we can activate the Quarkus magic
<?xml version="1.0" encoding="UTF-8"?>
<project xmlns="http://maven.apache.org/POM/4.0.0"
    xmlns:xsi="http://www.w3.org/2001/XMLSchema-instance"
    xsi:schemaLocation="http://maven.apache.org/POM/4.0.0 https://maven.apache.org/xsd/maven-4.0.0.xsd">
    <modelVersion>4.0.0</modelVersion>

    <parent>
        <groupId>com.myorg.demo</groupId>
        <artifactId>parent</artifactId>
        <relativePath>../parent</relativePath>
        <version>1.0.0-SNAPSHOT</version>
    </parent>

    <artifactId>service1</artifactId>

    <dependencies>
        <dependency>
            <groupId>com.myorg.demo</groupId>
            <artifactId>library1</artifactId>
            <version>${project.parent.version}</version>
        </dependency>
        <dependency>
            <groupId>io.quarkus</groupId>
            <artifactId>quarkus-arc</artifactId>
        </dependency>
        <dependency>
            <groupId>io.quarkus</groupId>
            <artifactId>quarkus-rest</artifactId>
        </dependency>
        <dependency>
            <groupId>io.quarkus</groupId>
            <artifactId>quarkus-junit5</artifactId>
            <scope>test</scope>
        </dependency>
        <dependency>
            <groupId>io.rest-assured</groupId>
            <artifactId>rest-assured</artifactId>
            <scope>test</scope>
        </dependency>
    </dependencies>

    <build>
        <finalName>service1</finalName>
        <plugins>
            <plugin>
                <artifactId>maven-compiler-plugin</artifactId>
            </plugin>
            <plugin>
                <artifactId>maven-surefire-plugin</artifactId>
            </plugin>
            <plugin>
                <artifactId>maven-failsafe-plugin</artifactId>
            </plugin>
        </plugins>
    </build>

    <profiles>
        <profile>
            <id>service1</id>
            <activation>
               <activeByDefault>true</activeByDefault>
            </activation>
            <modules>
                <module>service1</module>
            </modules>
            <build>
                <plugins>
                    <plugin>
                        <groupId>${quarkus.platform.group-id}</groupId>
                        <artifactId>quarkus-maven-plugin</artifactId>
                        <configuration>
                            <debug>5005</debug>
                        </configuration>
                    </plugin>
                </plugins>
            </build>
        </profile>
    </profiles>
</project>
Copy the src folder from the parent project (lazy dev approach ;-) ) and edit stc/main/resources/application.properties
quarkus.http.port=8081
Points to note
- pay attention to dependencies
- ports can be used only once, keep track of them.
I usually add a little table in my README.md file
| Service | port | debug | purpose |
|---|---|---|---|
| service1 | 8080 | 5005 | main app |
| service2 | 8081 | 5006 | sky api |
We are now ready to test.
Test the setup
First check if the modules build
mvn clean package
If you want to build a native executable
# once you specify a profile, no more default activated ones are active
mvn clean package -Pservice1,service2,native
Run one service
mvn compile quarkus:dev -Pservice1
Automate using VSCode tasks
The final piece is to create a .vscode/launch.json to configure the debugger and a .vscode/tasks.json to automate the launch of quarkus dev. The launch.json that adds to the debug dropdown:
{
  "version": "0.2.0",
  "configurations": [
    {
      "name": "Debug service1",
      "type": "java",
      "request": "attach",
      "hostName": "localhost",
      "port": 5005
    },
    {
      "name": "Debug service2",
      "type": "java",
      "request": "attach",
      "hostName": "localhost",
      "port": 5006
    }
  ]
}
The tasks.json allows to run the mvn command from the tasks menu in VSCode. The interesting one is Run solution which concurrently starts all services in their own shell window. I call this Run solution in all projects, so I can target it with a keyboard shortcut (which are (user) global, can't be specified per project)
{
  // See https://go.microsoft.com/fwlink/?LinkId=733558
  // for the documentation about the tasks.json format
  "version": "2.0.0",
  "tasks": [
    {
      "label": "Run service1",
      "type": "shell",
      "command": "mvn compile quarkus:dev -Pservice1",
      "group": "none",
      "presentation": {
        "reveal": "always",
        "focus": false,
        "panel": "new",
        "showReuseMessage": false,
        "clear": true
      }
    },
    {
      "label": "Run service2",
      "type": "shell",
      "command": "mvn compile quarkus:dev -Pservice2",
      "group": "none",
      "presentation": {
        "reveal": "always",
        "focus": false,
        "panel": "new",
        "showReuseMessage": false,
        "clear": true
      }
    },
    {
      "label": "Run solution",
      "dependsOn": ["Run service1", "Run service2"],
      "group": "none"
    },
    {
      "label": "clear",
      "type": "shell",
      "command": "mvn -B clear",
      "group": "none"
    }
  ]
}
Final touch: add this to your keybindings.json (Cmd+K, Cmd+S -> click on gear top right):
[{ "key": "ctrl+0", "command": "workbench.action.tasks.runTask", "args": "Run solution" }]
Adjust keys to your liking. In this example Ctrl+0 will launch both services and watch changes.
DevContainers
That's another strory for anaother time
Conclusion
There are quite some moving parts involved, once understood, not too hard to master. Let's hope the Quarkus CLI evolves to make the steps easier. Thanks again to Alexey for helping out
If you want to give it a shout, find it here
As usual YMMV. Happy coding!
Posted by Stephan H Wissel on 28 August 2024 | Comments (2) | categories: Java Maven Quarkus WebDevelopment