Automated Tests in Bluemix Build and Deploy
Bluemix is a beautiful environment for agile software development. Its build and deploy capability ensure continious delivery, so you can focus on code. A well run project requires automatic testing (starting with unit tests up to integration testing).
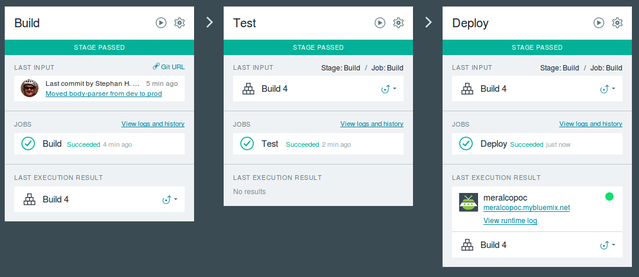
You can configure this in the Build and Deploy pipeline, so your project looks like this:

While you could argue: " I run my tests local", you might encounter the situation where you use the online editor and you then depend on the tests running in Bluemix. Setting up build and deploy is well documented and straight forward.
Inspecting the test job screen itself, we can learn that we have different testing options

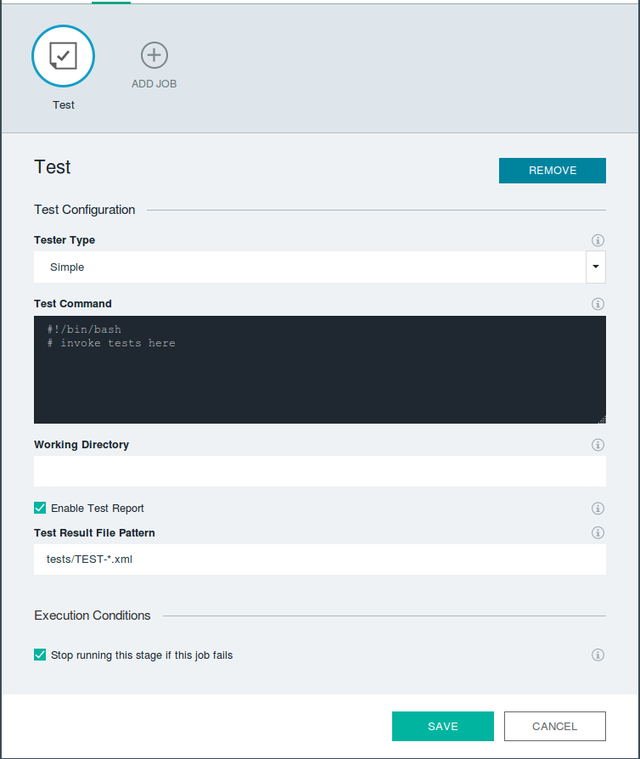
I specifically like the Sauce labs integration and the ability to run a code, security and vulnerability scan (So a real pipeline might have up to 4 distinct test stages). However the screen for "simple" tests, where unit tests go, isn't particularily helpful:

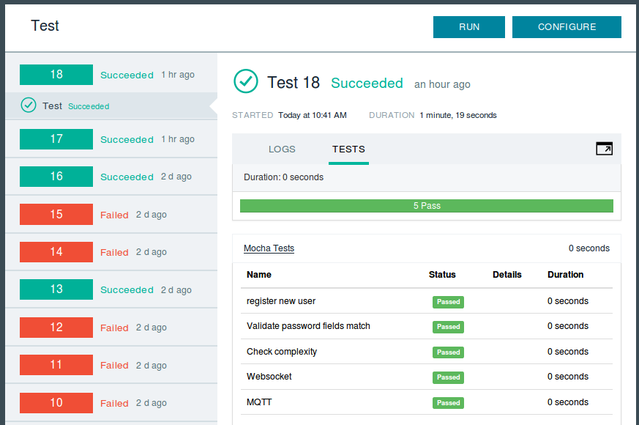
So lets shed some light on the inner workings.A test job can include a test report (including notifying SLACK, but that's a story for another time). This report needs to be in XML format, indicated in the default test results pattern. Old dogs will smell rat and conclude: ahhhh JUnit. And as a fact of the matter, JUnit report format is what Build & Deploy will process into a nice test result:

Running a JUnit test when you have a Java application is therefore quite simple. For front-end or Node.js applications its a little trickier, since you have plenty of choices.
Here is what I found when creating a test for an Ionic/Angular based front-end with an Node.js based backend:
Configuring and coding the various tests is a story for another time. As usual YMMV
You can configure this in the Build and Deploy pipeline, so your project looks like this:

While you could argue: " I run my tests local", you might encounter the situation where you use the online editor and you then depend on the tests running in Bluemix. Setting up build and deploy is well documented and straight forward.
Tip: For Java projects you should use Maven or Gradle build, so your library dependencies are properly resolved. For Node.js projects a "simple" build would suffice, however using npm install would make the stage fail if your package.json has an issue, so you don't run later stages and fail there
Inspecting the test job screen itself, we can learn that we have different testing options

I specifically like the Sauce labs integration and the ability to run a code, security and vulnerability scan (So a real pipeline might have up to 4 distinct test stages). However the screen for "simple" tests, where unit tests go, isn't particularily helpful:

So lets shed some light on the inner workings.A test job can include a test report (including notifying SLACK, but that's a story for another time). This report needs to be in XML format, indicated in the default test results pattern. Old dogs will smell rat and conclude: ahhhh JUnit. And as a fact of the matter, JUnit report format is what Build & Deploy will process into a nice test result:

Running a JUnit test when you have a Java application is therefore quite simple. For front-end or Node.js applications its a little trickier, since you have plenty of choices.
Here is what I found when creating a test for an Ionic/Angular based front-end with an Node.js based backend:
- The test stage uses the artifacts from build (or the version control). So anything in
node_modulesorbower_componentswon't be available yet. Hence you need to runnpm installand if you used bower,bower install(for full syntax see below). Bower would need to be listed as dev-dependency in the package.json file. Only with those steps you will be able to run any tests - The output directory for your tests must exist, so add
mkdir teststo the script - You must specify your choosen test framework in the
package.jsonfile as dev-dependency. Don't forget to also list all dependencies of your choosen test framework - You could specify the tests to run in the scripts section of the package.json or on the command line. In both cases you need to include the path pointing to the node_modules directory
- You can run multiple tests with different frameworks, just add another line in the script. Only make sure they don't overwrite each other report results
- To get Mocha to output JUnit format you call it with a reports parameter:
mocha -R xunit > test/TEST-MochaResult.xml. Mocha is well suited for node.js testing and to some extend for angular.js too - Using Karma requires a report karma-junit-reporter plugin, that you need to list in the
package.jsonfile. Then you can call it usingkarma start --reporters junit - Angular's dependency injection approach makes testing a breeze - once you figured it out. I found the least stressful way (a.k.a the one I got to work) was to use Karma which provides all the mock injection mechanism I needed.
Karma allows you to use your favorite test framework for the test description: Jasmine, Mocha or QUnit. How to use those is a story for another time (if you can't wait, start here for the official documentation or check this tutorial) - Testing a front-end application requires a browser. On a desktop machine or in Sauce labs, the tool of choice is Selenium, which launches clean instances of Chrome, IE or Safari (even MS Edge). Your build server has none of them installed (or even a gui shell where they would run), so you need to specify phantom.js as your browser. Test results hence might vary
# !/bin/bash
npm install
./node_modules/.bin/bower install
mkdir tests
./node_modules/.bin/mocha --reporter xunit > tests/TEST-MochaResults.xml
./node_modules/.bin/karma start --reporters junit
Configuring and coding the various tests is a story for another time. As usual YMMV
Posted by Stephan H Wissel on 26 November 2015 | Comments (0) | categories: Bluemix