Fun with TCPMon and Lotus Traveler

Martin Luther (the original) famously stated " man muss dem Volk aufs Maul schauen" (roughly translated: " you have to watch how people talk". What worked for a bible translation also works in IT.
While it is nice to have some documentation, quite often it is inaccurate, incomplete, outdated, factual wrong or simply missing. So listening to "how applications speak" is an essential skill, mentioned here before. In this little weekend project these skills get applied to Lotus Traveler. These are our ingredients:
While it is nice to have some documentation, quite often it is inaccurate, incomplete, outdated, factual wrong or simply missing. So listening to "how applications speak" is an essential skill, mentioned here before. In this little weekend project these skills get applied to Lotus Traveler. These are our ingredients:
- Domino server with installed Traveler listening on http Port 80 (https won't do). Also make sure that compression is switched off in the internet site document for traveler, it's no fun to watch gzip encoded data
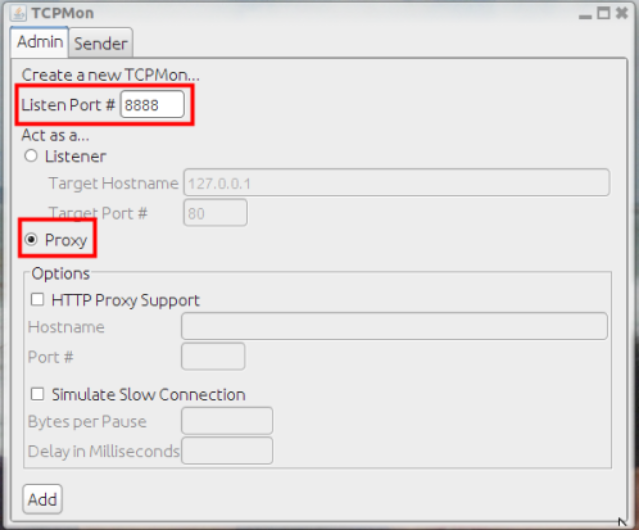
- Apache TCPMon installed and listening on port 8888 in proxy mode
- The Android SDK, installed with an Android device emulator. Alternative: a physical Android device (and your ports open on your machine)
- TCPMon needs to be configured in Proxy mode.
You can test if that is working by pointing your browser's proxy setting to127.0.0.1:8888. Note: you need the real IP in the Android phone or emulator. The TCPMon screen then nicely shows the outgoing requests and incoming responses: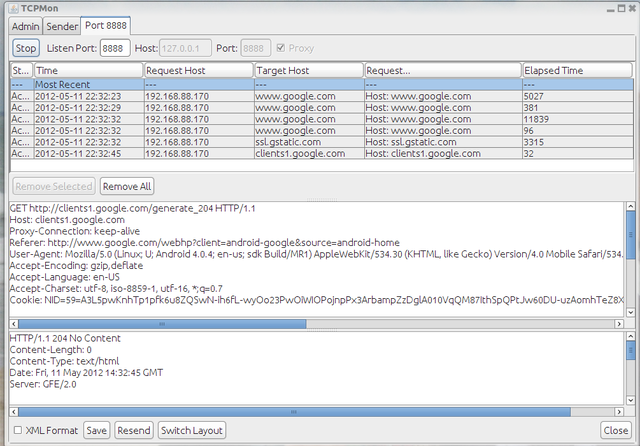
- Time to configure an Android emulator. After installing the Android SDK you can launch
tools/androidfrom the install directory to download and install the various versions of the Android OS Emulations from 1.0 all the way to 4.0.3. In the Tools menu you can manage your AVD (Android Virtual Devices) and configure different images. The emulator comes with the option of snapshots, quickstart, cold boot etc.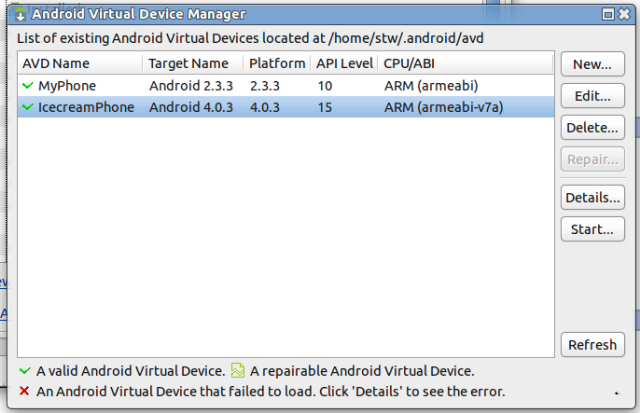
I found the 4.0.3 devices substantially slower than the 2.3.x devices, which might be based on the higher default screen resolution. Once you have configured the AVD, you could start it directly from the menu - However starting an AVD from the command line is much more practical, since it allows for a lot of parameters. Most notably the ability to cold-boot and the ability to define a proxy or even dump the whole TCP conversation into a dump file. So I started my AVDs with
android-sdk-linux/tools/emulator -avd MyPhone -http-proxy 192.168.88.170:8888andandroid-sdk-linux/tools/emulator -avd IcecreamPhone -http-proxy 192.168.88.170:8888resulting in
- Along the way I encountered a few odities: some of the commands would ignore the proxy parameter and try to reach out directly. I got that sorted out by configuring the device to use the proxy in the access point settings.
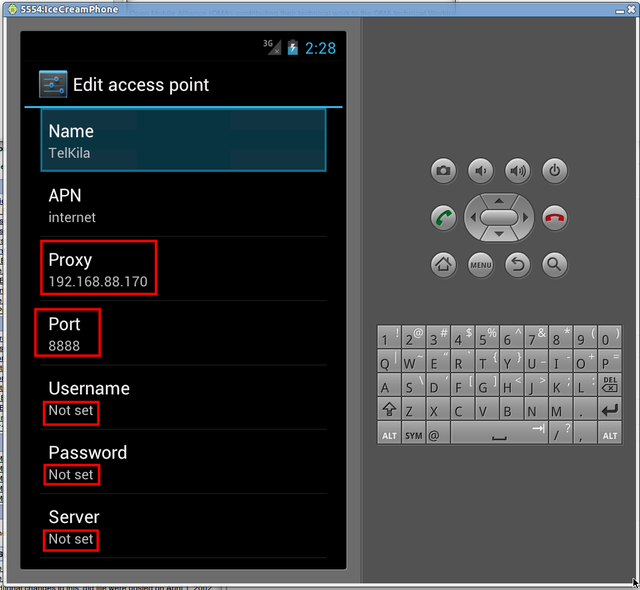
(Don't forget to use Menu - save when changing this). Important here is to clear out username, password and server which have a one character value. For a reason beyond my comprehension the initial configuration of traveler would not work with any proxy setting - could be the TCPMon here, with Fiddler it might work - so after downloading the installer, run the installer and download traveler I had to switch off both proxy settings for the initial configuration. The AMD can be just terminated and then called without the proxy parameter and it would resume where it left off - Make sure to have the proxy back in the HTTP stream to watch what is happening. It is quite enlightening
- The first thing once the new device is ready is a request to fetch the configuration which against the current fashion is delivered as XML document that very closely resembles DXL. The request looks like this:
GET http://yourtravelerserver:80/servlet/traveler?action=getConfig&deviceId=Android_somedeviceid HTTP/1.1
Content-Type: application/x-www-form-urlencoded
Host: yourtravelerserver:80
Connection: Keep-Alive
User-Agent: Lotus Traveler Android 8.5.2.1
Authorization: Basic Base64EncodedUserNamePassword= - Then you can go on and watch the initial sync happening. To understand what device and server are talking to each other, you need to ask OMA, there the best documentation is available - you might have guessed: Traveler on Android is using SyncML. You can learn how "push" actually works
Posted by Stephan H Wissel on 13 May 2012 | Comments (0) | categories: Show-N-Tell Thursday