wissel.net

Usability - Productivity - Business - The web - Singapore & Twins

By Date: March 2018

Authenticate from Salesforce to Heroku with JWT


Heroku PAAS is an easy and flexible way to extend Salesforce functionality.
Its easy to call out to a Heroku REST service build with a method of your choice: Java, JavaScript, Ruby etc.
The usual sticky point between two platforms is the identity of the caller.

In a lot of cases the only requirement is "a valid Salesforce user", eventually with some additional claims added.
For this scenario a JWT Bearer authentication (RFC 7519) is a good pick.

When you look around, most examples revolve around a JWT token being issued after some means of authentication from the same system that was authenticated against.
This scenario is different: The Salesforce server issues the JWT token and code on Heroku validates the token as authorization.
The beauty of the approach: no extra calls need to be made to get this working.

What you will need:

  • A valid certificate, in this case self signed is good enough (it won't be used by a browser)
  • OpenSSL installed on your computer
  • A Heroku account

Preparing the certificate

In Salesforce setup open Certificate and Key management.
Create or pick a key. Note down the name. For this article I will use YourCertNameHere. Open the key and click on Download Certificate.
The cert will be downloaded in crt format. We use this file to extract the public key that Heroku will use to verify the signature. To get the key use:

openssl x509 -pubkey -noout -in YourCertNameHere.crt

The String we need is between the BEGIN and END lines, excluding the lines. You can store it into a file or create a Heroku environment variable.
Since it is a public key, you don't need to guard it as fiercly as your private keys.

The APEX code

Before making a call-out to Heroku, you need to componse the signed JWT token. That's done in just a few lines:

public static String getJWTBearer(String subject, String keyName) {
    Auth.JWT jwt = new Auth.JWT();
    jwt.setSub(subject);
    Auth.JWS myJws = new Auth.JWS(jwt, keyName);
    return myJws.getCompactSerialization();
}

You might opt to add additional claims beside the subject, when your use case does require that.
The header value gets added to the Authorization header as Bearer authorization.

Java code

I'm using the jjwt library which is available on Maven Central.
It makes it simple to retrieve a claim. An expired claim or an invalid signature will throw an error, so wrap it into a try/catch.

import java.security.Key;
import java.security.KeyFactory;
import java.security.spec.X509EncodedKeySpec;
import java.util.Base64;

import io.jsonwebtoken.Claims;
import io.jsonwebtoken.Jwts;

public class JwtVerifier {
 public static Claims getClaims(String key, String token) throws Exception {

  byte[] byteKey = Base64.getMimeDecoder().decode(key);
  X509EncodedKeySpec X509publicKey = new X509EncodedKeySpec(byteKey);
  KeyFactory kf = KeyFactory.getInstance("RSA");
  Key realKey = kf.generatePublic(X509publicKey);
  return Jwts.parser().setSigningKey(realKey).parseClaimsJws(token).getBody();
 }
}

The only catch in the code was the need for MimeDecoder instead of a standard Decoder for Base64 decoding.
The subject, typically the user, can be retrieved using claims.getSubject()

Next stop, for another blog entry: the NodeJS equivalent.

As usual YMMV!


Posted by on 23 March 2018 | Comments (0) | categories: Heroku Identity Management Java JWT Maven Salesforce
Using LetsEncrypt certificates in your JKS


Dealing with certificates in Java is always fun. The keystore Java uses is different from the certificate files you are used to in your web server or node.js.

Salesforce is build on Java, so we have to make peace with the Keystore. This article outlines the steps to use a LetsEncrypt certificate in a keystore. You will need:

  • Internet connection
  • OpenSSL installed
  • Able to run the LetsEncrypt challenge
  • Access to your DNS to add a record (for the challenge)
  • Java runtime installed
  • Public IP address

For this sample I will use the Domain “demo.example.com”

Obtaining a PEM certficate from LetsEncrypt

Easiest is to use the certbot utility on a Linux machine (e.g. spin up an instance on Heroku). DigitalOcean has detailed instructions.
There used to be a tls-sni challenge which was marked insecure, so you want to the DNS challenge.

sudo certbot certonly --manual --preferred-challenges dns -d demo.example.com

Convert PEM to PKCS12 format

First concatenate all PEM files into one. Presuming you used the Letsencrypt mechanism:

sudo cat /etc/letsencrypt/life/demo.example.com/*.pem > fullcert.pem

Then use OpenSSL to convert that into PKCS12 format. Note: if you do that on a Windows command prompt you must run the command prompt as administrator otherwise you just get an error

openssl pkcs12 -export -out fullchain.pkcs12 -in fullchain.pem

Prepare a Java JSK keystore

You can't just create an empty keystore, so create a new temp key and specify a new keystore, then delete that key. That gives you the empty keystore:

keytool -genkey -keyalg RSA -alias sfdcsec -keystore sfdcsec.ks
keytool -delete -alias sfdcsec -keystore sfdcsec.ks

Import pkcs12 into JKS

Almost final steps. Don't forget your passwords

keytool -v -importkeystore -srckeystore fullchain.pkcs12 -destkeystore sfdcsec.ks -deststoretype JKS

Adjust alias for Salesforce import

The Salesforce import utility is picky about Alias names. The previous import created the entry
Alias name: 1 which needs to be updated:

keytool -keystore sfdcsec.ks -changealias -alias 1 -destalias demo_example_com

And voilah, you have a properly signed certificate for your Salesforce instance. Downside: to be repeated every 90 days.

As usual YMMV!


Posted by on 22 March 2018 | Comments (4) | categories: Java Salesforce

A filtering proxy server with vert.x


Scenario

You have this nice application running in your (cloud or on premises) environment and then a big scare hits. Suddenly you need to remove or mask different streams of data depending on all sorts of conditions your legal department is torturing advising you.

Until your applications natively can do that, you might resort to a content filter that sits as a proxy between you and the application (technically it is a reverse proxy, but that's fine print).

To explore the feasibility of such an approach I created SampleProxy based on work of Julien Viet using vert.x as my runtime environment.

Requirements

  • Needs to be a content filter, not a URL blocker
  • Need to provide functionality for practical use out-of-the-box, but needs to be extensible (configuration over code)
  • Need to be able to filter HTML, JSON, XML and Text. No need to filter binary formats. Contemplating about JavaScript (you could use the text filter for that)
  • Filter based on mime-type and URL as standard, but extensible to use anything in the request or reply to decide what to filter
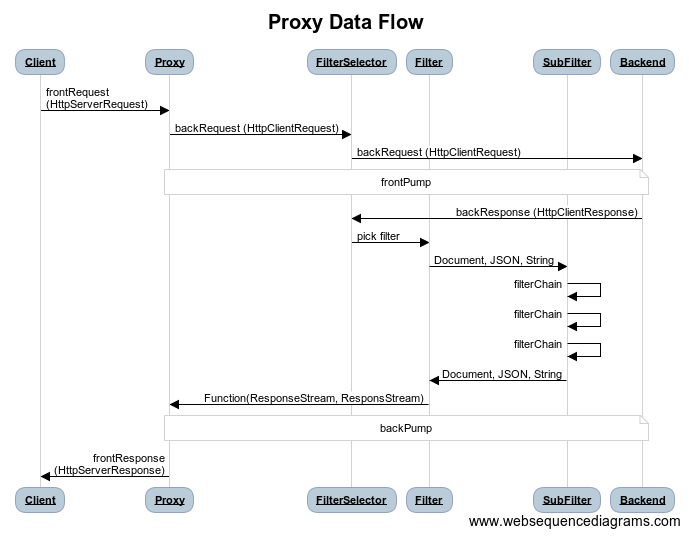
  • Configurable FilterChain: a filter decides what to filter (with the mime-type as minimum condition) and hands actual filter operation to a chain of subfilters that do the actual stream manipulation
  • configurable subfilters. E.g. a filter that can remove JSON nodes from JSON data should read the qualifier from a configuration, so the same filter class can be reused for different filter purposes
  • CSS isn't on the radar yet, but contributions would be happily accepted

The flow

Flow from browser to proxy to application and back

Things I learned along the way

There are always a few lessons to be had, here are some from this project:

  • http is a chunked beast. When you send larger amount of content, probability approaches 1 that your server uses chunked - until HTTP/2 resolves us from it. A hard choice needs to be made to either use a stream based processing of a chunk (think SAX) or collecting the Junks to be able to process a DOM. To be fully flexible I opted for a DOM/Object based approach, but you are free to create whatever you deem necessary
  • Jsoup is a reliable HTML parser. It supports CSS selectors that make addressing HTML elements a breeze. Solves one of the hardest problems: targeting
  • Targeting JSON data is much harder that it needs to be, the very moment Arrays appear in your JSON structure. There is RFC6901 JSON Pointer, but it targets exactly one element, while a typical use case would be: "from the list (array) of discussion posts, pick the list of comments and those who have an eMail, mask them". So I implemented 2 variations: a simple path style address /discussion/posts/comments/email which automatically traverses arrays and an XPath based approach where I convert JSON to a strict XML syntax and back. More detail here, examples in a future post

Items on the ToDo list

  • Better documentation
  • Code cleanup
  • Tests
  • Deploy to Heroku button
  • More filters

Your turn

Go check it out and let me know what you think! (Yeah - documentation needs some work).

Caveat (a.k.a disclaimer): this is a prototype and work in progress, YMMV!


Posted by on 04 March 2018 | Comments (0) | categories: Heroku Java vert.x